Embroidery Questions?
Get help
Browse our collection of educational articles.

It's easy to create a personalized stuffed plush animal with your home or commercial embroidery machine. Our line of soft embroiderable plush animals from Cubbies, Embroider Buddy and Hidey Boo all have zippers which hide a secret compartment. Opening the zipper reveals a self contained stuffing pouch, which when removed, enables you to hoop the teddy bear and embroider directly on it. The removable stuffing pods also make them machine washable, so they can be easily cleaned if needed. Once you learn the simple tips and trick to embroider the stuff animals, you will be stitching them out in no time. They make great gifts and can also be a profit generating product for your business.
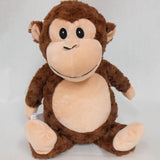 We have lots of embroidery friendly animals and plush toys to choose from. If you can't find one that suits your needs, we also have an embroiderable sports ball collection. In this example we chose a Cubbies Monkey, but the process is the same for all the animals.
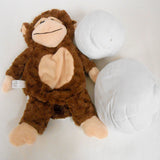 Unzipper the animal and remove the stuffing pods. Most of them have 2 pods, one in the head and one in the body.
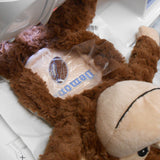 only, with the sticky side up. Place your animal onto the sticky part of your backing using your hands to smooth out the surface. Place the Stitch-N-Heat film on the top and secure it with some tape. When using the sticky backing, it's only required to hoop the stabilizer in the hoop as the peel and sick backing will hold the animal in place.
 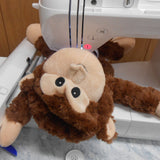 and start embroidering. Keep a close eye on your machine while stitching, making sure none of the animals extremities are getting caught and interfering with your machine's movement.
Leave a comment